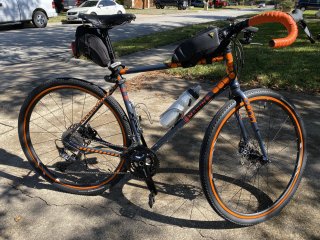
During the past few weeks, I took the time to completely strip down my bike and rebuild it. The whole drivetrain and other components were replaced for a more modern gravel-specific ride.
Ever since I got my Marin Nicasio, I pretty much have tinkered with it since day one. As of right now, there isn’t a damn thing left that is stock with it. Along with the various wheelsets I own, virtually every facet of this bike has been upgraded. So, what changed? Here’s a basic list of all the new components:
- Shimano 105 Dual Control Levers (ST-R7000)
- Shimano GRX Front Derailleur (FD-RX810)
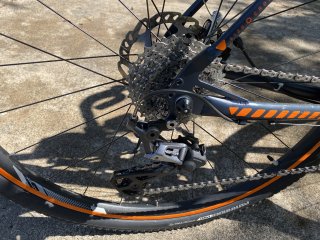
- Shimano GRX Shadow RD+ Rear Derailleur (RD-RX810)
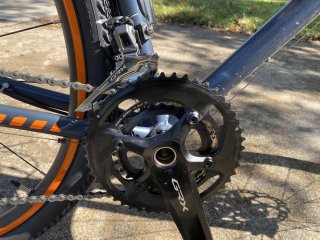
- Shimano GRX Double Crankset 48-31T (FC-RX810)
- Shimano 11-speed Cassettes 11-34T (CS-HG800)
- Shimano 105 Threaded Bottom Bracket (SM-BBR60)
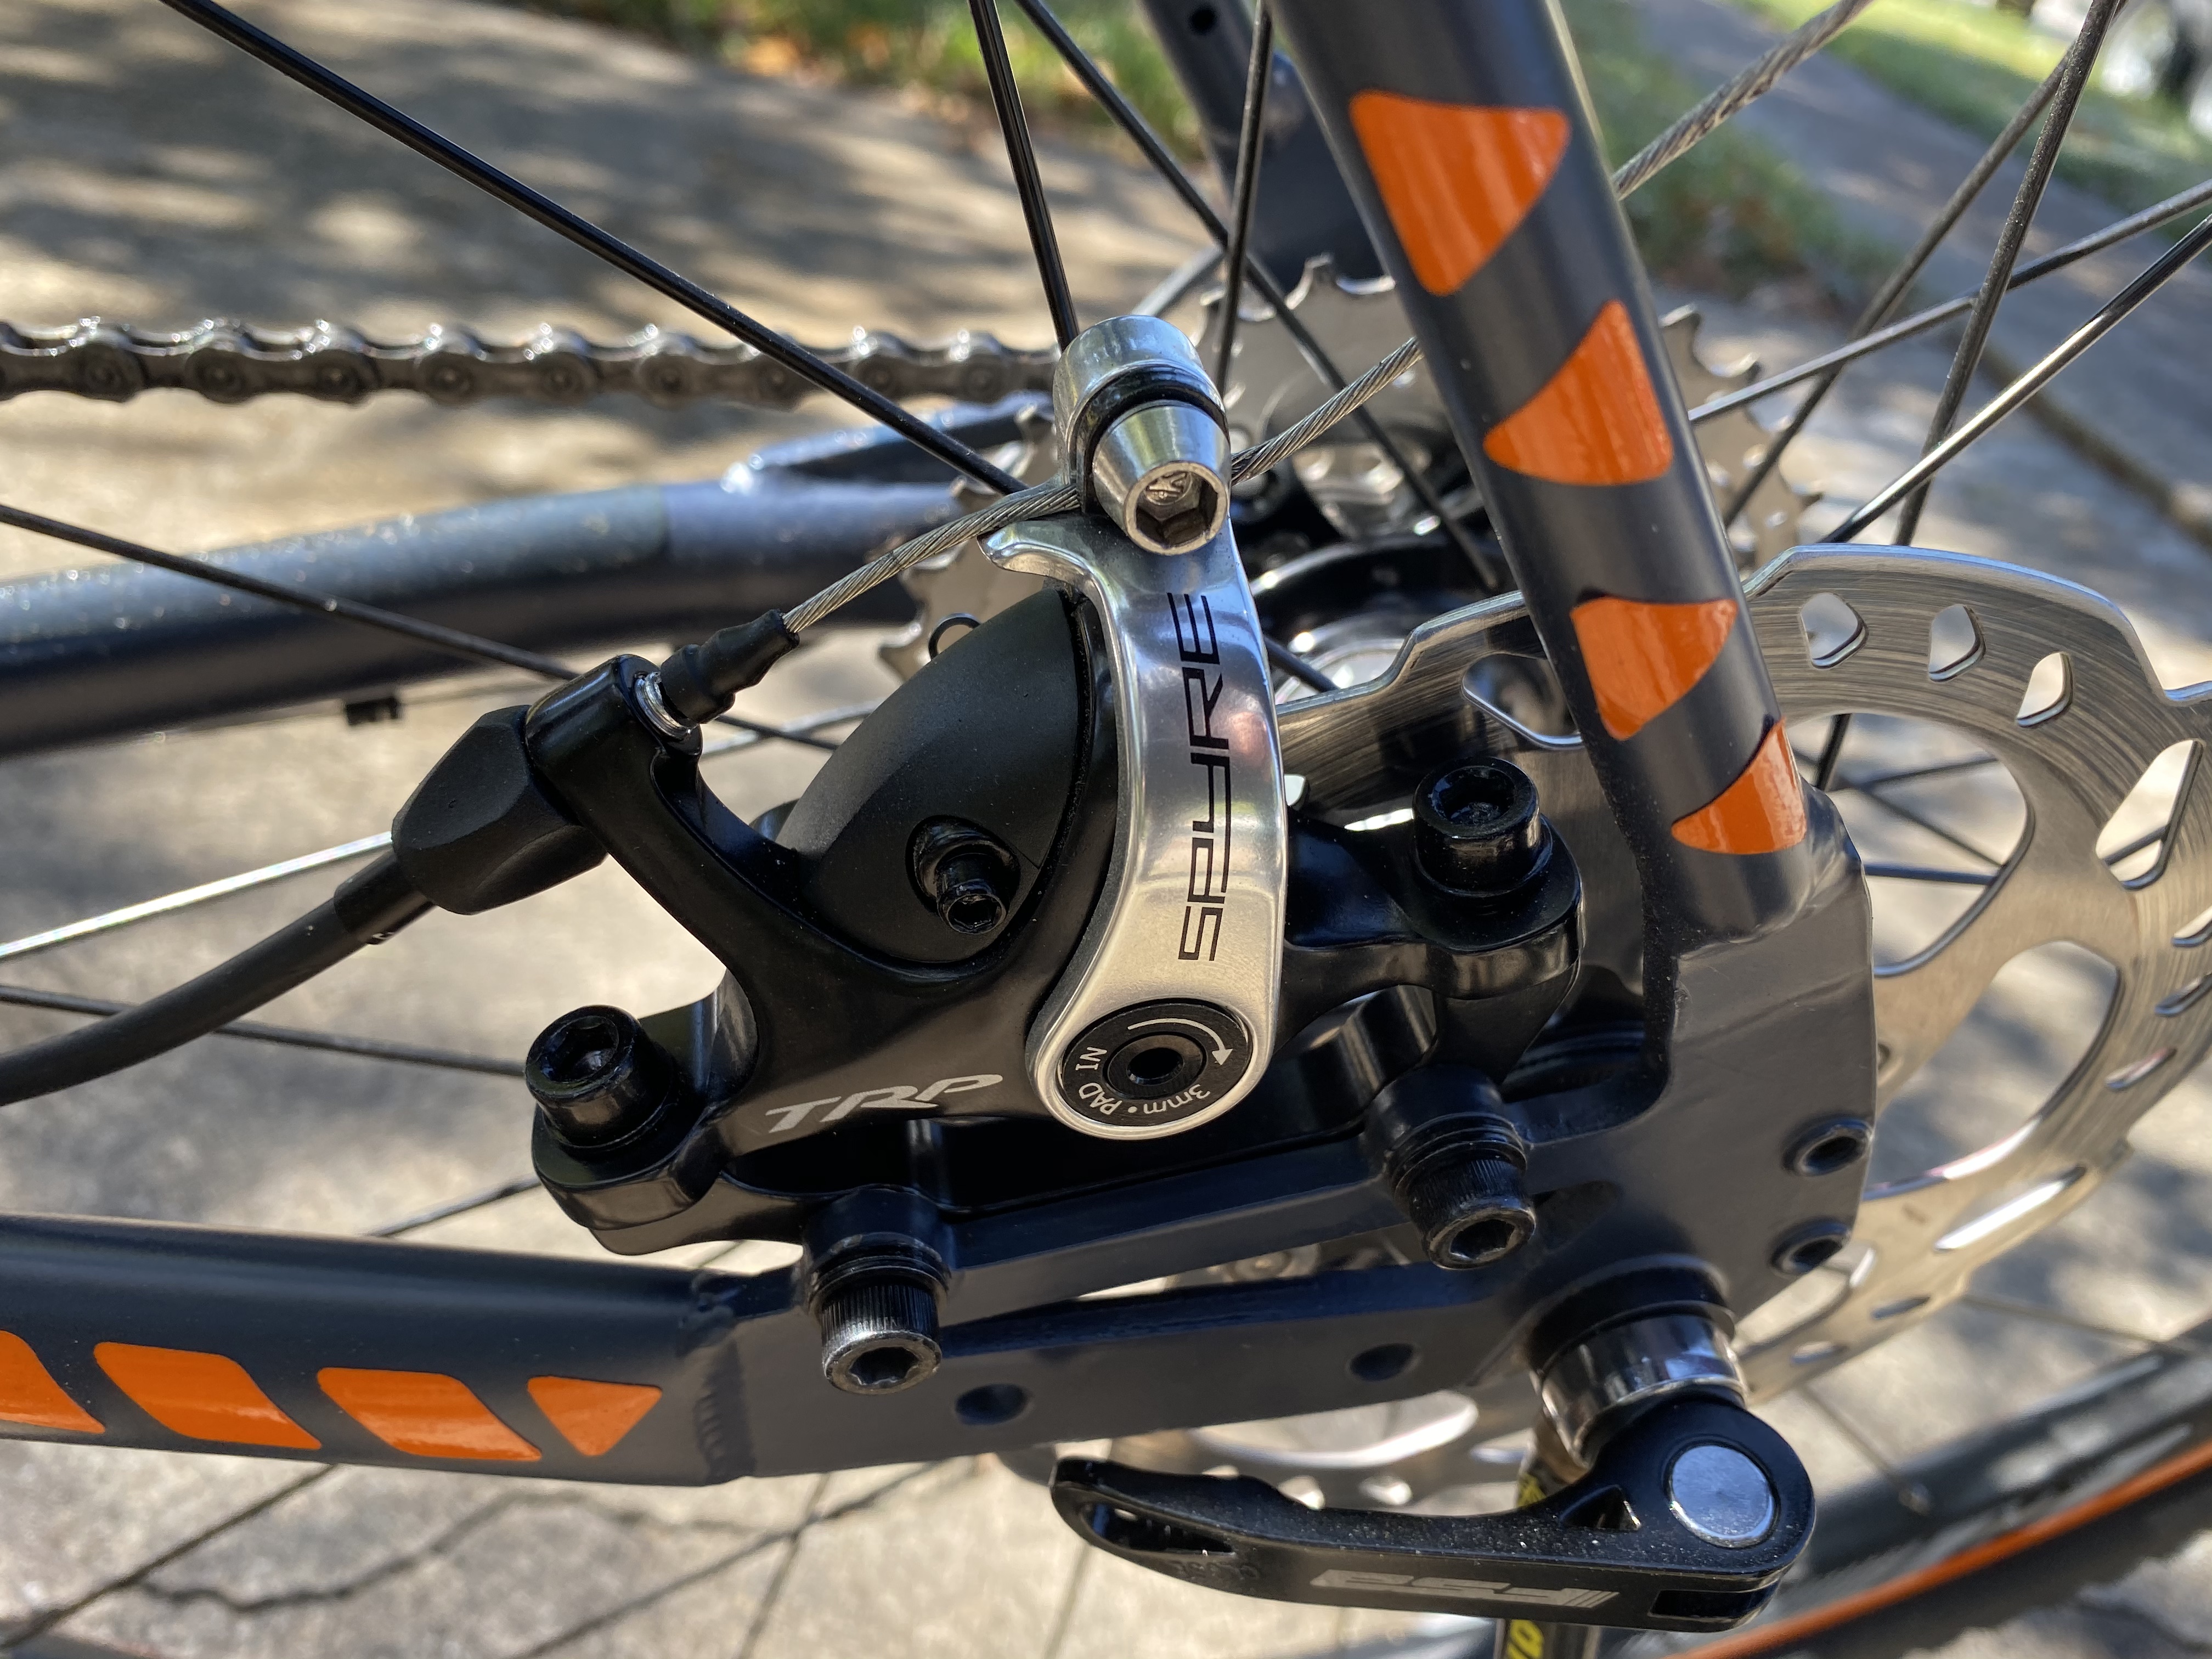
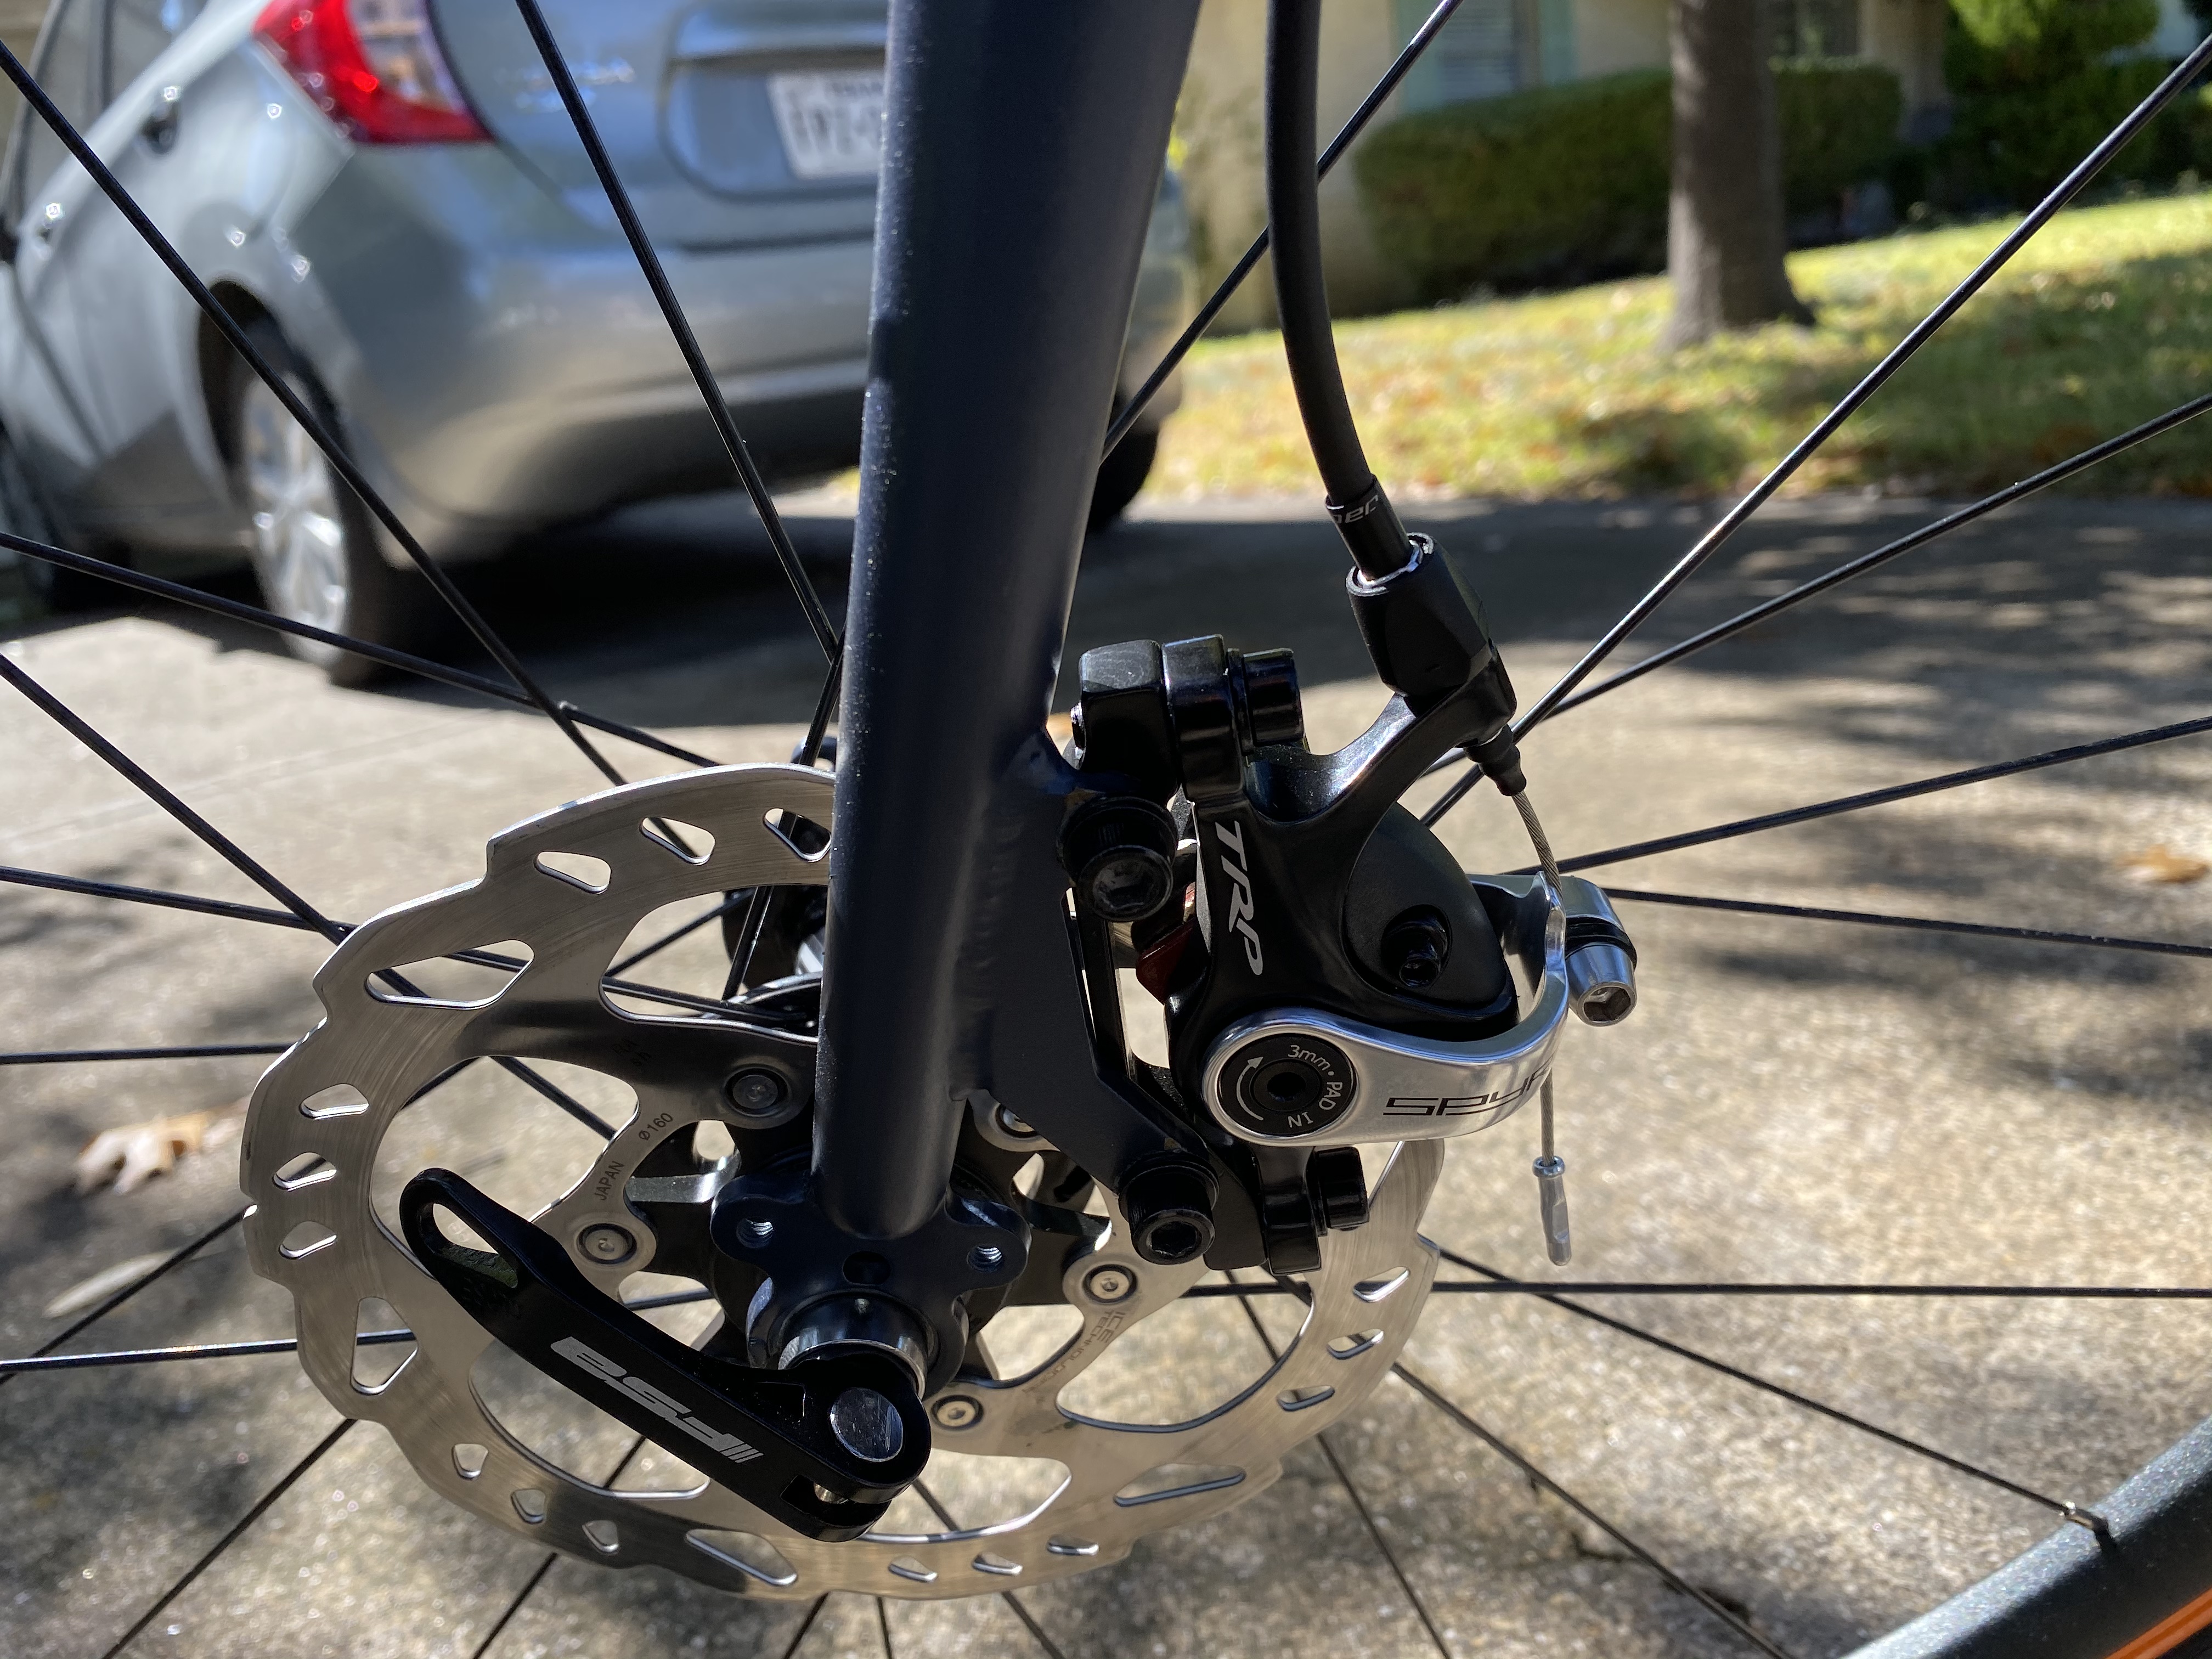
- TRP Spyre Post Mount Brakes
- Ritchey Comp Drop In Integrated Headset (1 1/8”)
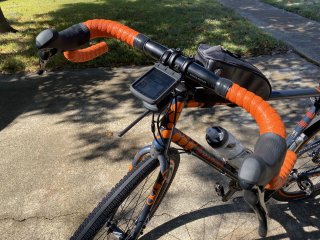
- Salsa Cowchipper Deluxe Handlebar
As you can see, the basic idea was to upgrade to a full Shimano GRX groupset. However, because of a few gotchas I had to modify the setup a little bit. More on that in a sec.
For the gearing, the idea was to get somewhat close to what I had so that I could still do some road riding. I’m not a speed demon so I honestly don’t care if the top gears are all that big. With my previous gears, I was running a 50/34T crankset with a 11-32T 8-speed cassette. The new cassette gives me pretty much the same thing but with 11 speeds and a bigger 34T gear. The Shimano GRX had a 48-31T crankset option which, while a bit smaller, gives me just enough on the top-end to allow me to maintain good speeds on the road. But the gains in the low-end are where its at. That 31T chainring is what will really give me the most flexibility, especially on all-terrain gravel rides.
Hurdles In The Rebuild
Stripping the bike down and rebuilding it wasn’t without its challenges. The Marin Nicasio is essentially a classic steel frame. As such, it doesn’t have the most modern standards such as thru axles and flat mounts for brakes. I knew there would be some issues. I just didn’t know what. All I knew is that I would likely run into a bunch of hurdles in getting where I wanted to be.
Updating the Bottom Bracket and Cranks
The first hurdle I had while stripping down the bike was with the cranks. The FSA cranks I had on there required a special tool to get them off. On top of that, the bottom bracket was of the square taper type so I would need a tool for that too. It’s highly unlikely I’ll ever use these parts again so I opted just to go to the bike shop and have them remove the cranks and bottom bracket. Much cheaper just to pay someone $16 to remove something than the cost of tools would allow…especially tools I probably won’t use again.
The new bottom bracket and cranks went on like a dream. Super easy to install! Unlike the previous bottom bracket, the new Shimano one fits nice and plush to the frame. Just had to use a crank tool to screw in each side of the bottom bracket and make sure they were nice and tight. The cranks were equally easy to install.
Updating the Headset
The second hurdle was with the headset. After removing the forks and cleaning the headset, I knew pretty much right away that the bearings were beyond repair. With a bike like this, it’s no wonder since the stock components were about as cheap as you can get. I purchased an AheadSet TR headset and, with an extra trip to the bike shop, got things squared away. The main thing was getting the old crown race off and installing the new one. This is another part that would have required a special tool. I mean, I could have probably removed it myself on the cheap but it would have been a royal pain in the ass. Just another thing that was much easier to have the bike shop do. Why waste time on something you don’t have to do all that often, right?
As I’ll mention later, I learned that the headset I used wasn’t actually the right one. The benefit of the Ritchey one over the AheadSet one is that it has sealed bearings. I wasn’t really sold on the AheadSet one anyways. You had to grease the bearings yourself. Plus, the top bearing cover was made of a hard plastic with a rubberized seal around it. I didn’t really feel good about it. Everything worked but...well...like the bottom bracket, the steering tube is the next thing that gets a pretty heavy load when riding. Without a solid headset, you’re pretty much asking for trouble. So, yeah, glad I caught this before any serious damage occurred.
Updating the Levers and Brakes
The third and biggest hurdle had to do with the brakes. I originally wanted to go with the Shimano GRX 810 levers and hydraulic brakes. Upgrading to hydraulic brakes was probably the one thing I was most looking forward to. Unfortunately, I learned that hydraulic brakes just won’t work with my frame. The reason? Flat mount brake calipers won’t work on an IS mount frame! Sucks big time but it’s true. And the shitty part is that the new GRX levers only come as hydraulic.
Fortunately, the Shimano GRX line is compatible with other components. I was able to keep the derailleurs and crankset. Only thing I had to replace was the levers and brakes. After a bit of research, I found that the latest Ultegra and 105 levers will work with the GRX derailleurs. Because there’s very little different between the Ultegra and 105 levers, I opted for the 105’s.
Along with that, I got some TRP Spyre brakes which are a nice step up from the stock mechanical brakes I was using. The Promax Render brakes I was using were ok. But as Avid compatible brakes they left a lot to be desired. I could never get them to not be so damn scratchy with the pads. Just always felt weird for some reason. The Spyre’s work with Shimano brake pads which, based on what I’ve read, have more even wear and better braking power than most Avid-based brakes.
Updating the Derailleurs
The fourth hurdle was with the front derailleur. The new Shimano GRX 810 front derailleur comes only as braze-on. Because my frame only allows for a clamp-on derailleur I had to get an adaptor. The problem is that generic braze-on adaptors just don’t work. Newer Shimano front derailleurs have a support bolt that really needs to be used. Otherwise, you run the risk of shifting not being as smooth. Plus, without a more Shimano specific adapter, I noticed that the skid plate on the derailleur would hit the chain. The whole derailleur needs to be brought in a few millimeters for everything to work. So, order went in for a new adapter at the bike shop. Fortunately, the adaptor worked and the support screw rested nicely on the adapter itself. Problem solved!
All wasn’t well though with the front derailleur though. Once I got the chain on and started adjusting the derailleurs I learned that the cranks would hit the front derailleur when it was in the highest gear. Plus, when the derailleur was at its lowest the chain would hit the skid plate just on the inside. Keep in mind that I had the end adjustment screwed maxed out. In fact, the high end adjustment screwed got bottomed out (really frustrated me with that one!). Something was definitely askew!
Turns out that I needed to shim the cranks a bit. I added a 1.8mm shim onto the crank side which fixed the problem. Quite a daunting task really. I wasn’t sure what shim to use so there was lots of trial and error. If I used too many shims I couldn’t get the crank cap on for the left crank. Even then, the crank cap is hard plastic and I think it got a little stripped during the process.
One thing about the shims. There’s two ways to go about it: either put them on the cranks or on the bottom bracket. At first I thought about putting them on the crank shaft itself which, for a Shimano Hollowtech II crank, meant a 24mm diameter shim. But after talking with a bike tech at REI, I had second thoughts about putting a shim directly on the crank. As he put it, a lot of stress is being put on the cranks so adding shims to the cranks might not be a good idea...especially if Shimano didn’t design the cranks or the bottom bracket to work that way. As such, it was better to put the shim on the bottom bracket. An aluminum shim will likely take the stress much better over time than the plastic ones you get for a crank shaft.
The last source of frustration was the high end adjustment screw on the front derailleur. With the mess of the shim going on, I bottomed out the adjustment screw and, at first, thought that the derailleur was hosed. So, as a nice quick tip, if you bottom out an adjustment screw and can’t get it to go back in, try taking it completely off and screw it back in on the opposite side. Be careful when screwing it back in though. You definitely don't want to strip it out.
The rear derailleur went on without a problem. For a component that is so complex it was probably the easiest one to deal with. Go figure! What’s neat about this one is that it has a clutch that allows you to adjust the tension on the chain. I noticed this when the bike was in the smallest gears. The chain was really slack and at first I didn’t know how to really fix it. Boy, was it easy! Just a quick adjustment using the clutch screw and the slack disappeared. Nice!
Updating the Handlebar
To top everything off, I decided to switch out my handlebar for the Salsa Cowchippers. I’ve been riding with the Coefficient Wave handlebar and, while I really like them, I wanted to see if adding more flare and outsweep would improve gravel riding. The thing I noticed about my riding style is that I tend to want to twist my hands in when in the hoods. A handlebar that doesn’t have much flare and/or outsweep doesn’t really allow you to angle the hoods in. Plus, I felt like I had to always ride with my elbows in. Otherwise, my wrists would feel more strain and pressure.
The handlebars I’ve used don’t really allow for much in the way of angling in the hoods. The Wave only has about 1.6 degrees of flare, not enough to really do much with the hoods except point them straight up. My previous bar, the Salsa Cowbell, was better with a 12 degree amount of flare. I could angle in the hoods a bit but not quite enough to where I could feel a huge difference.
With a Salsa Cowchipper, you get a pretty modest amount of both flare and outsweep, 24 degrees and 12 degrees respectively. This allows me to angle in the hoods to where I have a more natural position with my hands and wrists. Benefit of this is that, whether I’m riding in the hoods or the drops, I can let my elbows hang out which aids in keeping things more stable on rougher terrain. Not only that but it feels more comfortable.
Only hurdle with it was what I though ended up being a bent bar. I noticed this when I turned the handlebar all the way to where it hit the frame. I noticed that each end hit the frame at a different height. I tested it and switched out the bar with the Cowbell. I didn’t see any problems and I could only surmise that the bar I had was defective during manufacturing. Switching out the bar wasn’t the problem though. Yet another indication of the wrong headset. More on that later.
Finishing It All Off With Bar Tape
Once everything was put together and working, I adjusted the handlebar and wrapped it with bar tape. This time around I chose to use Fizik's Performance bar tape which doesn’t appear to be sold anymore by Fizik. It looks to be somewhat like the more current Tempo Bondcush Classic being that its 3mm thick and uses their microtex material. Not sure how it really compares to their more current stuff. Regardless, it's fairly cushy and has a nice leatherette feel.
I chose orange for the color because, well, all the accents on my bike are a bright orange. Might as well stick out like a sore thumb. So orange it is!
This stuff doesn't have a lot of stretch to it. In fact, theres some stitching that runs just off the center of the tape (which doesn’t appear to be a feature with the newer Tempo Bondcush tape). You can give it a little pull but you definitely don't want to pull it too hard. Otherwise, you could end up damaging the tape. I wrapped it with a firm but gentle tug around the bar. It went on fairly smooth but you do have to watch for any slack. Fortunately, the tape is super forgiving if you need to back up and try again.
The drops were fairly easy to wrap although it did get a little more difficult to maintain a clean wrap about two thirds of the way up. The figure eight around the hoods went pretty smooth too. Took a few times to get it right but nothing tricky. The rest was super easy.
To finish off the bar, instead of using electrical tape, I started using this stuff by Domain Cycling. It's a silicone self fusing tape that is absolutely fantastic. It's way better than electrical tape for sure. It's not super pricey either. Around $11 a roll. One roll will deliver quite a few wrappings so you probably won't have to replace it for a while. To get things started, I used the finishing tape that came with the bars to hold the finished wrap in place. Then I just wrapped the Domain Cycling tape right over it so that its reinforced and holds the derailleur and brake cables firmly onto the bar.
First Test Ride
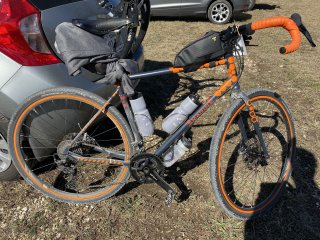
My first test ride was a bit of a calamity. I wanted to mount a third bottle cage under the down tube but needed a few washers to make sure that the cage didn’t get in the way of the derailleur cables. So, figure a little ride to Home Depot would do the trick. I wanted to tweak the calibration of my PowerPod power meter so that it works better for gravel so I did a quick calibration ride up and down the street. After that I headed off to Home Depot.
Lots of things were noticeably different. Shifting with the new GRX derailleurs and 105 levers was super smooth compared to the Claris ones. The handlebars felt good and seem to add more comfort with the levers canted in. I do miss the tops of the Wave handlebars though. The Fizik bar tape does help a lot though and keeps the bar feeling comfortable.
I noticed right away the difference in gearing. The main thing is that what used to be my main cruising gear was a bit higher than before. With the 8-speed cassette before, I would cruise using around the 4th or 5th gear on level roads with the 34T chainring. On the 11-speed cassette with a 31T chainring that same gearing is now around the 7th and 8th gear.
On the low-end, I gained four gears in place of the previous two. With the previous 32T chainring I had a 1.06 ratio with the 32T sprocket on the cassette. You would think that would be a 1-to-1 ratio, right? Nope! The next gear up from that, a 28T sprocket, gave me a 1.21 ratio.
With the new 31T chainring with a 34T sprocket, I now get a 0.91 ratio which is just under a 1-to-1 ratio. From there the gearing goes down to 30T, 27T, 25T sprockets with ratios of 1.03, 1.15, 1.24 respectively. I could definitely tell the difference. No doubt my pedal efficiency will get better with the extra gears.
However, I lost some of the high-end. The top-end of the 50T chainring gave me about a max speed of around 32 mph with a 90 rpm cadence. With a 48T chainring though, that speed drops to a little over 30 mph. Not a huge difference and honestly no big loss really.
The ride went smooth all the way to Home Depot. From there, I ventured down a different street on my way home. A few miles out though the chain decided to jump off the front chainring when switching to the larger chainring. Figured there might be some tweaking to do to the front derailleur so this was my first sign of that. Jumped off my bike, unzipped my saddle bag, grabbed a portable wet towelette, put the chain back on, wiped my hands, and went on my way.
Not far from there I noticed that the power readings off the power meter were too high. So...I stopped and fiddled with the power meter a bit, did another calibration ride, and continued on my way.
About another couple of miles, I stopped at a light and a guy drove up telling me that my saddle bag was open. $%&@!! Noticed right away that some things fell out. Ended up double-backing to pickup what dropped out. Fortunately, nothing of major consequence: a small bottle of sunscreen and a cover for my saddle. The saddle cover was probably the more important one. Only thing I lost was a microfiber towel. No biggie. Still...kinda pissed me off that I did that.
The rest of the ride went super smooth. Once I got back I made a few tweaks to the derailleurs and everything was good to go for a bigger ride.
Full Gravel Ride
I decided to go for broke and give the newly upgraded bike a huge test. For that, I signed up for the 2019 Roadrunner Rocks gravel ride sponsored by The Spinistry. I rode the 50K route and it was by far the most challenging bike ride I’ve ever done. I wrote about this ride in a prior post but, long story short, while my bike did great I bonked out hard!
Not only was it super hilly but the terrain threw me for a loop. There were hills with inclines upwards of 7 - 8 degrees. Some of them were super relentless. I think there was one that was a quarter mile long. Plus, on top of that, some of the roads were still a little wet and mushy making it super difficult to go up them even in the lowest gears. Suffice to say, I bonked and had to walk up many of the hills, especially in the last few miles.
Good news is that the bike took it all like a pro. Even though I bonked, I could tell that the lower gearing and range definitely helped. I never felt like I had to struggle to find the right gear.
I also found the drops on the Cowchipper to be super useful. The thing I noticed is that going downhill on a gravel road felt more stable when in the drops. Normally, I would have to bring my elbows in but, with the Cowchipper, I could get in the drops while still flaring my elbows out a bit. This helped a lot with handling which was smooth but highly responsive. With many of the faster downhill gravel runs, I was able to get upwards of 20 mph. Man, what a rush!
Only thing that went wrong was some mud got up into the bottom of the fork. Didn’t hurt anything but the noise of the mud hitting the tire was super annoying. Really wish there was a plug or something that I could put in the bottom of my forks. Hmm...
Final Thoughts
Overall, I’m super happy with the results. It was a bummer that I couldn’t use the GRX levers with hydraulic brakes. That will come later though. This has me thinking about a frame set upgrade. When that happens, I can upgrade the levers and brakes as well as move to thru-axle wheels which, fortunately, two of my wheelsets can easily be converted to. Other than that, the rest can be migrated on over to a new frame set. In the meantime, my current bike is running great and has a lot of life left in it.
Only thing I learned just today, the day after my big gravel ride, was that the headset I used is actually the wrong one. What I needed was an integrated headset, not one of the standard threadless variety. Big difference really. While they’re both technically threadless, an integrated headset is one where the frame has cups built in for the bearings.
The Aheadset one I used sort of worked but it doesn’t seat properly onto the frame, which explains why the handlebar seemed a bit bent. While no damage seemed to occur, over time, it probably would have eventually led to some damage being done to the frame and fork. I ordered a Ritchey integrated headset which is nearly identical to the one that came on the bike. Once the headset is switched out the upgrade will then be complete.
One thing I mentioned to someone the other day was the connection I feel with my bike. Like many cyclists, my bike is an extension of myself. This whole experience of tearing my bike down to the frame and rebuilding it has strengthened that connection. I feel closer to my bike than ever before. That experience was felt even on the Roadrunner Rocks ride. Even though I fell apart, even with the wrong headset installed, my bike kept going. It got me where I needed to go. I consider that above all else the sign of a successful upgrade. Time for more adventures!
Post a comment!
Comments
Glad to find this! I've picked up a Nicassion+ and the brakes are shocking.. Looking at something that can at least bring me to a standstill whilst going downhill
Yeah, short of adding full hydraulic brakes, the TRP HY/RD are a great upgrade. They're not perfect, but still better than standard cable actuated brakes.
Nice detailed write up on upgrades and experience. I plan to do similar upgrade next year. I’m intrigued by a line you said you used to cruise at 4th or 5th gear in claris. I can cruise in 6th unless its 2/5 combination vs 1/5
Lovely writeup. All the more so because i'm in the same position you were with your Nicasio v1.0. I am looking to upgrade everything on it except the frame and handlebar. Did you replace your hubs as well? If yes, which ones did you get? I'm confused about size, brand, the details. I know i want to replace them for sure. 2.5 years of riding and not much maintenance has taken it's toll but here we are.
I went with a set of pre-built wheels, specifically the Quality Wheels Shimano 105/DT Swiss R500 (front and rear) ones. As long as you follow the standard for quick release wheels then you're fine, which basically a 12x100mm thru axle in the front and a 12x142mm thru axle in the back. :)
Hi, did you use the stock marin hubs with an 11 speed casette? Would it fit?
I actually upgraded my wheelset so that I could have a bit wider rim for bigger tires. The hubs on the stock Marin wheels were just...err...ok. The stock wheels won't likely accept anything above a 10-speed cassette due to the hub spacing. So, like me, you're probably better off upgrading your wheelset to something that has more flexibility. I ended up getting a wheelset from Handspun Quality Wheels that uses DT Swiss wheels and Shimano 105 hubs which uses centerlock for securing the rotors and cassette. Much, much better than the stock Marin wheels for sure! Plus, you open up the ability to add a larger speed drivetrain. :)
Hi, Thanks for the infos ! Could you tell me more about the bottom bracket ? Is it an ITA or BSA ? Léo
On the SM-BBR60 page, Shimano doesn't really say but since it's a common threaded BB I'm gonna guess BSA. Definitely not ITA though.
Can you refine the headset model? According to your link, there are three types of them with different parameters. I cannot find a suitable one in bikediscount
You bet! The one I use is the Ritchey Comp Drop In Integrated headset. Specifically, it's for a 1-1/8" diameter steerer (non-tapered) so its the same size on top and bottom. The upper has a SHIS fit of IS42/28.6 with the lower being IS42/30. Any integrated headset with these specs will work. plus, while the stack height of this one is 6.8mm, you can go with pretty much any stack height you wish. The Nicasio has plenty of tube on top so you can go with a taller headset to eliminate some spacers if you want.
Hi, what's adapter you used to front derailleur?
Hi there! I used a Shimano adapter like this one:
https://www.amazon.com/SHIMANO-Dura-Ace-FD-R9150-Derailleur-Adapter/dp/B01N6ULXCP
The Shimano one is required because of the support bolt on the derailleur. Other adapters I tried didn't have any area for the support bolt to rest. As such, you have to use a Shimano specific one. They're cheap so no biggie.