When I first got my road bike, one of the things I had contemplated was fancy bartape with some sort of cool pattern on them. The problem with that is that most of the bar tape that is like this kind of sucks. I tend to want bartape that is cushy and provides a lot of comfort, especially for long gravel rides where some added shock absorption is a must. I ended up just getting a few rolls of some thick gel tape and double rolled my bar.
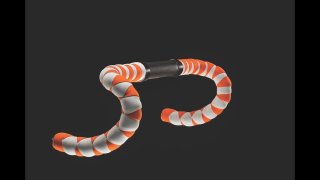
One of the treatments I had seen that caught my eye was this diamond patterned Harlequin bar tape treatment. I remember seeing this post on the Serfas website about the Serfas Bar Tape Challenge. The look is quite striking and really all that's needed is an extra color of bar tape.
Fast forward to now and I started thinking about this again. I had upgraded to a new Coefficient Wave handlebar and while I've been very happy with it I wasn't so happy with the bar tape I put on it. I had double wrapped it with two different types of bar tape: a base layer with some Specialized S-Wrap Roubaix gel tape and a top layer with Supacaz Kush bar tape. The Specialized was supposed to provide a solid bit of cushiness with the Supacaz offering a more tacky surface so that I can possibly ride without gloves so much. The cushiness was kind of there but I think the Specialized tape kind of flattened out a bit. The Supacaz was ok but didn't feel as cushy as the Specialized, nor was it as tacky as I would have liked. Basically, the two didn't really mix all that well.
So, at this point, I figure this was a ripe time to try out a two-tone bar tape treatment. This would allow me to get the cushiness I was looking for out of just one bar tape type. Plus, it would also provide an opportunity to upgrade my bike with a really cool new look for my handlebar!
For a Harlequin wrap, most the tutorials recommend using a bar tape that you can stretch. That rules out bar tape from brands like Lizard Skins and such. For this treatment, I purchased some Bontrager gel cork bar tape, one roll of black and one roll of orange to be exact. There are cheaper brands of bar tape but I figured the Bontrager is likely thicker than the cheap stuff so it's worth the extra bit. It's not as expensive as others I've used though. Next time, I'll likely try out a cheaper brand just to compare.
If you've never done a Harlequin wrap, it helps to have some sort of tutorial to go off of. There's a few out there but the Harlequin handlebar tape tutorial on the Goat Rides Bikes website is a pretty good one. He even has a nice video tutorial showing how he does it:
Some folks start at the top and work their way down. That seems to be the trend when using cotton bar tape. But that seems to be reserved for old road bikes which results in a more classic look. I might try doing it from the top next time but for this treatment, just like in the tutorial, I started from the bottom which does present some challenges in itself.
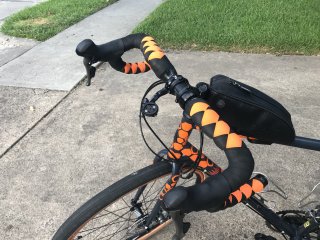
Because of the unusual shape of my Coefficient Wave handlebars, I ended up only doing a partial diamond treatment on the tops and drops. Because of the notch near the top of the drops, I wanted to keep that part fairly tight. Adding diamond patterns there just seemed too difficult so skipping that part made it easier.
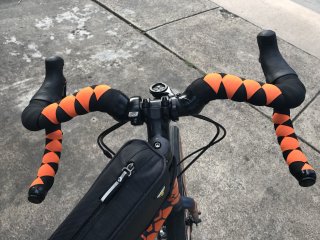
Same applied to the tops near the hoods. I skipped the sides and started the diamonds just after the bend. Since I tend to spend a lot of time in the hoods and sides, I figured this would allow me to add a little extra cushioning. I was able to add at least four diamonds to the tops though. The end result turned out to be pretty nice:
The only thing I had to do was go back and tighten up the bar tape on the tops a bit. Apparently I didn't give it enough tension and part of my bar started showing a little near the corners. That's one of the things about this sort of wrap...you really need to make sure you're wrapping it nice and tight!
End capping them was a bit of a pain. You really have to be careful and not tear the bar tape else you won't be able to cap it right. I ended up just using a bit of black electrical tape to dress and cap the ends of the drops. Not quite as nice as a typical capping but it'll do.
So far, I'm quite pleased with the result. As with anything, you learn by doing. The first time doing this sort of wrap is a pain in the ass. It got easier with the second side and, now that I have it down, the next time I do it will definitely be easier. Time to go test it on a big ride! :D
UPDATE: After a big ride, I found that the Bontrager gel tape tended to slip too much. The problem was that the backing came off after the tape was stretch. End result is that it wouldn’t stay put on the tops when weight was applied to the sides. I ended up pulling it off and returning it. After that, I rewrapped the handlebar with some Planet Bike Comfort Cork bar tape which is significantly cheaper, just as comfortable, and has better backing.
Post a comment!
Comments
Be the first to leave a reply!