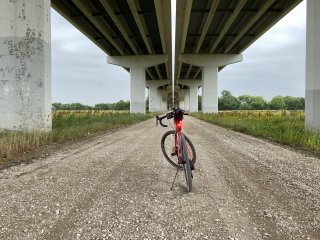
As a cyclist, one of the accessories that you’ll likely have to deal with is bike lights. That’s especially true if you’re riding at night but, as many cyclists have learned, riding on streets with lights even during the day time can greatly increase your safety.
Now, there are many, many options and I can’t go through them all. Instead, I’ll simply go through the ones I’ve personally owned or tried and give little mini-reviews. This journey has taught me a lot and allowed me to arrive at the light set I currently use. So, to begin, let’s look at the first lights I started off with and go from there.
Light & Motion Urban 700 Tundra Front Light Mini-Review
Light & Motion is a rather odd company. They make a lot of different kinds of lights for different things: photography, cinema, underwater, drones, emergency & adventure, and of course bike lights.
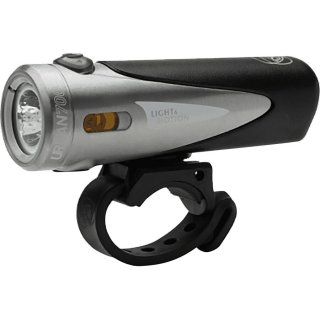
When I started riding a road bike, I knew I wanted to ride more at night, especially on group rides. However, I didn’t want to spend a whole lot of money on a front light. Based on my research, a light that puts out 700 lumens is sufficient for night-time riding. The Urban 700 certain fits the bill and doesn’t cost too much either. Retailing for $69.99, its actually a brighter light than most other bike lights within the same price range.
Mounting the Urban 700 to my handlebars was a breeze and easy to adjust as well. I ended up buying an adaptor for my front wheel so that I could mount my light to the front quick-release. Light & Motion does have a variety of mounts for their lights including GoPro and helmet mounts.
The Urban 700 is powered by a Cree LED light and has amber side lighting for additional visibility. The beam pattern is pretty good, lighting up a fair amount of area in front of you. The light has just four settings: high, medium, low, and pulse. Clicking the power buttons toggles between the modes. The light stays pretty cool and doesn’t get too hot. Running it on high for a while does result in a bit of heat but that’s to be expected with virtually any bike light.
The problem I found with the Urban 700 and other similar lights is the runtime. If you run it on high (full 700 lumens) you’ll only get about an hour and a half of runtime. Many of the nighttime rides I go on last a good 3 to 4 hours. As such, I’m forced to run it on low (175 lumens) which is barely adequate. For the most part, it works and I can see what’s ahead of me...but I really wished it was brighter at times, especially when I was riding by myself. I found that the mid-level setting, which is around 350 lumens, worked best but only gave me around 2.5 hours or so of runtime.
Don’t get me wrong. It’s a great light for the money and does the job. As a commuter light, it works great. But if you’re hoping for something a little brighter with a longer runtime, you might want to consider spending a bit more and getting a brighter one with more battery life. This particular model is actually quite old. Light & Motion have a bunch of other models that might suit your needs better.
A good 8 months after purchasing the Urban 700, it started to crap out on me. Apparently, the battery was faulty and no longer held a charge all that well. The good news was that Light & Motion honored their warranty and gave me a new one. But rather than using it, I simply sold it and got a different light that better suited my needs.
NiteRider Sentinel 250 Tail Light Mini-Review
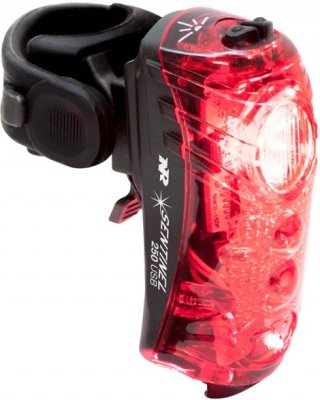
The NiteRider Sentinel 250 was the first tail light I bought. Retailing for $59.99, it’s not the cheapest tail light but not the most expensive either. It’s a really bright light with a few extra features that make up for the price.
At the time, I was using a rather large saddle bag and was having a hard time figuring out which light I could put on my bike. The problem is that most lights attached to the seat post using a bracket. But my saddle bag was so big that it would droop down the seat post. No way I would be able to comfortably fit a bike light on the seat post so I had to find something that would work.
The NiteRider series of bike lights were among the few that I saw that had clip-ons built into the light. While they do come with mounting brackets, you have the choice of leaving it off and just slipping the light onto something using the clip-on. This worked out quite nicely since my saddle bag had a built-in spot to clip a light onto. The clip was snug and wouldn’t slip off mid-ride so no worries there.
But what about the light? Was it any good? Absolutely!
The thing about this light is that it’s bright...I mean, REALLY bright. So bright that the highest setting of 250 lumens will have group riders asking you to turn it down. That’s why they call the lowest setting “Group Ride Mode”. Trust me, you’ll want to use it on a group ride.
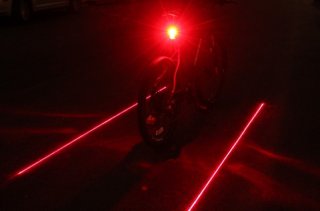
But the most distinguishing feature of this light is the Laser Lanes feature which throws two laser lines on the ground below the light. It’s an interesting feature and it certain got some grins on group rides. But whether or not it actually improves safety is a bit subjective really. It’s cool for sure...but is it really needed?
The only thing I didn’t like about this light is the mounting bracket. Eventually, I replace my saddlebag for a better one that wasn’t so big and needed to mount the light to my seat post. The mounting bracket that came with the light felt a bit clunky. It worked but didn’t feel like it really kept the light securely in place.
At the time, I also added a rack to the back of my bike, which I take on and off as needed for longer rides. I had to get a different mounting bracket for it, which turned out to require a NiteRider specific one. I don’t know if it was the bracket or the light itself but for some reason the light just didn’t want to stay attached. During two different rides the light fell off after hitting a good bump in the road. The first time I heard it but second time I didn’t and had to backtrack to find it. That second one is what made me give up and just take the light back to REI for a refund. Great light...but didn’t trust the mounting brackets for it.
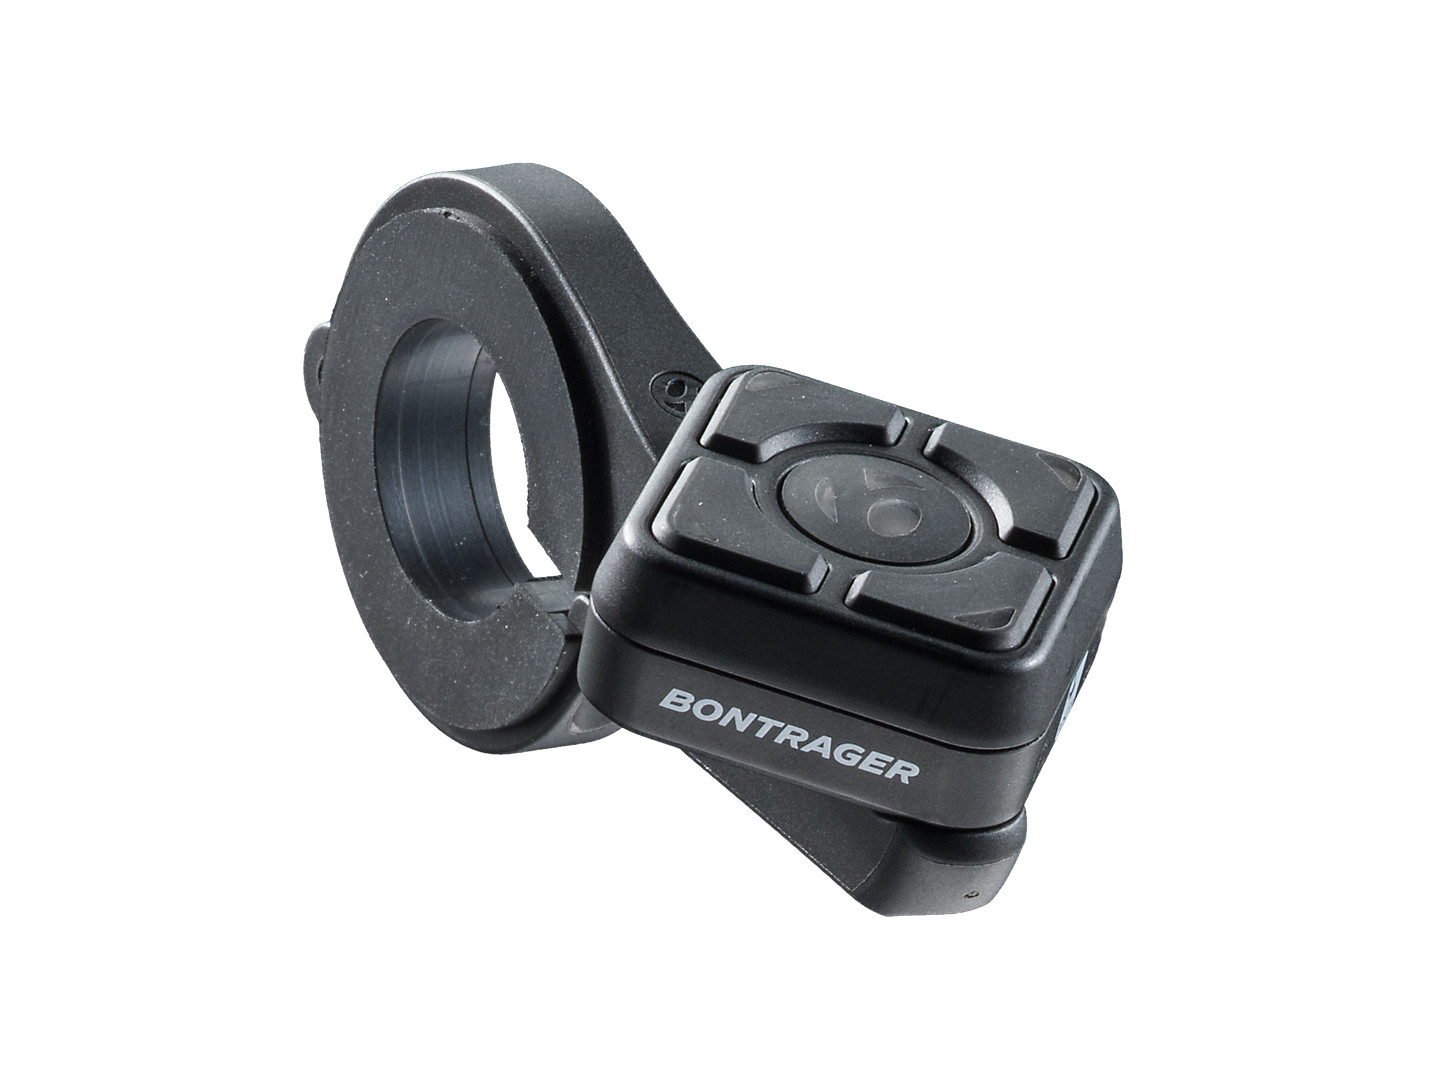
Bontrager Flare RT Lights with Transmitr Mini-Review
After my Urban 700 crapped out, I started looking at different light sets. One that caught my attention was the Bontrager Flare RT, an ANT+ enabled tail light that can be controlled either with a Garmin headunit or the Bontrager Transmitr wireless remote. At $59.99 and $49.99 respectively, they’re definitely not cheap, especially when you consider the output of the lights being only 90 lumens.
However, add two Flare RT’s, a Bontrager Ion Pro RT, and a Transmitr and you open up some interesting possibilities. The idea is that you can control the different modes of your lights mid-ride using the Transmitr with just a press of one of 4 different buttons. Need to quickly turn on the high setting of your front light? No problem! Forgot to turn on your rear lights? No problem! Just press the appropriate button on the Transmitr and it’s done!
Another trick you can do with the Transmitr and a couple of Flare RT lights is using them as turn signals. I loved this idea and thought it would add quite a bit of security in that cars behind me would know where I’m going. The idea is really cool...in theory that is. I had a few problems with this setup.
First, you can’t mount the Flare RT lights to your seat stays. It requires different mounting brackets (which fortunately are cheap!). Even then, the brackets are kinda hard to mount right. I had to fiddle with the different rubber spacers to get the right combination. They were kinda hard to get positioned just right and, even then, the lights weren’t exactly straight.
Second, the Transmitr mount is made out of cheap plastic and will easily snap if mounted too firmly to your handlebar. I had to exchange out the mount for an open box at the store due to this. Very annoying.
Third, and most importantly, I could never get the Transmitr and Flare RT lights to work as turn signals. I followed the directions to the T but they just never worked. In the end, I just returned everything and got different lights. My thinking is that if it’s this hard to get them programmed correctly then they’ll likely continue to frustrate me down the road. Just not worth it at the price you pay. Great idea but poorly implemented.
Cygolite Ranger 1400 USB Front Light Mini-Review
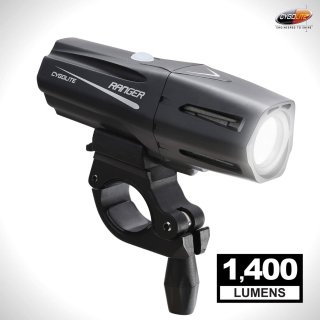
I returned the Bontrager Flare RT and Ion Pro RT lights (I bought them as a kit but, as you learn, I later bought the Ion Pro RT separately) and started looking at different lights. At this point, I wanted a front light that would put out more lumens for a longer length of time. I knew that lights like this would cost a bit over $100 so I was prepared.
One of the guys at REI recommended the Cygolite brand, specifically the Ranger 1400. The specs looked great on this one. On low, Cygolite claims it’ll last for a good 9 hours. While it’s not clear, it looks like that’s at 400 lumens, which is definitely better than the Urban 700 Tundra.
However, after getting it home, the good feelings were gone pretty much instantly. The handlebar mount that it comes with wouldn’t fit around my handlebar. Seriously. The mount wouldn’t go around a standard 31.8 mm clamp area of the handlebar. Why? Who does Cygolite think is using these lights? I was seriously baffled by this.
Took it back immediately so I never really got to test it. Sad really cause the light itself seemed like it might be a pretty damn good light. Sadly, it appears that Cygolite’s mounting solutions are quite anemic compared to other companies. They really need to step it up or else they’ll never get ahead of the competition.
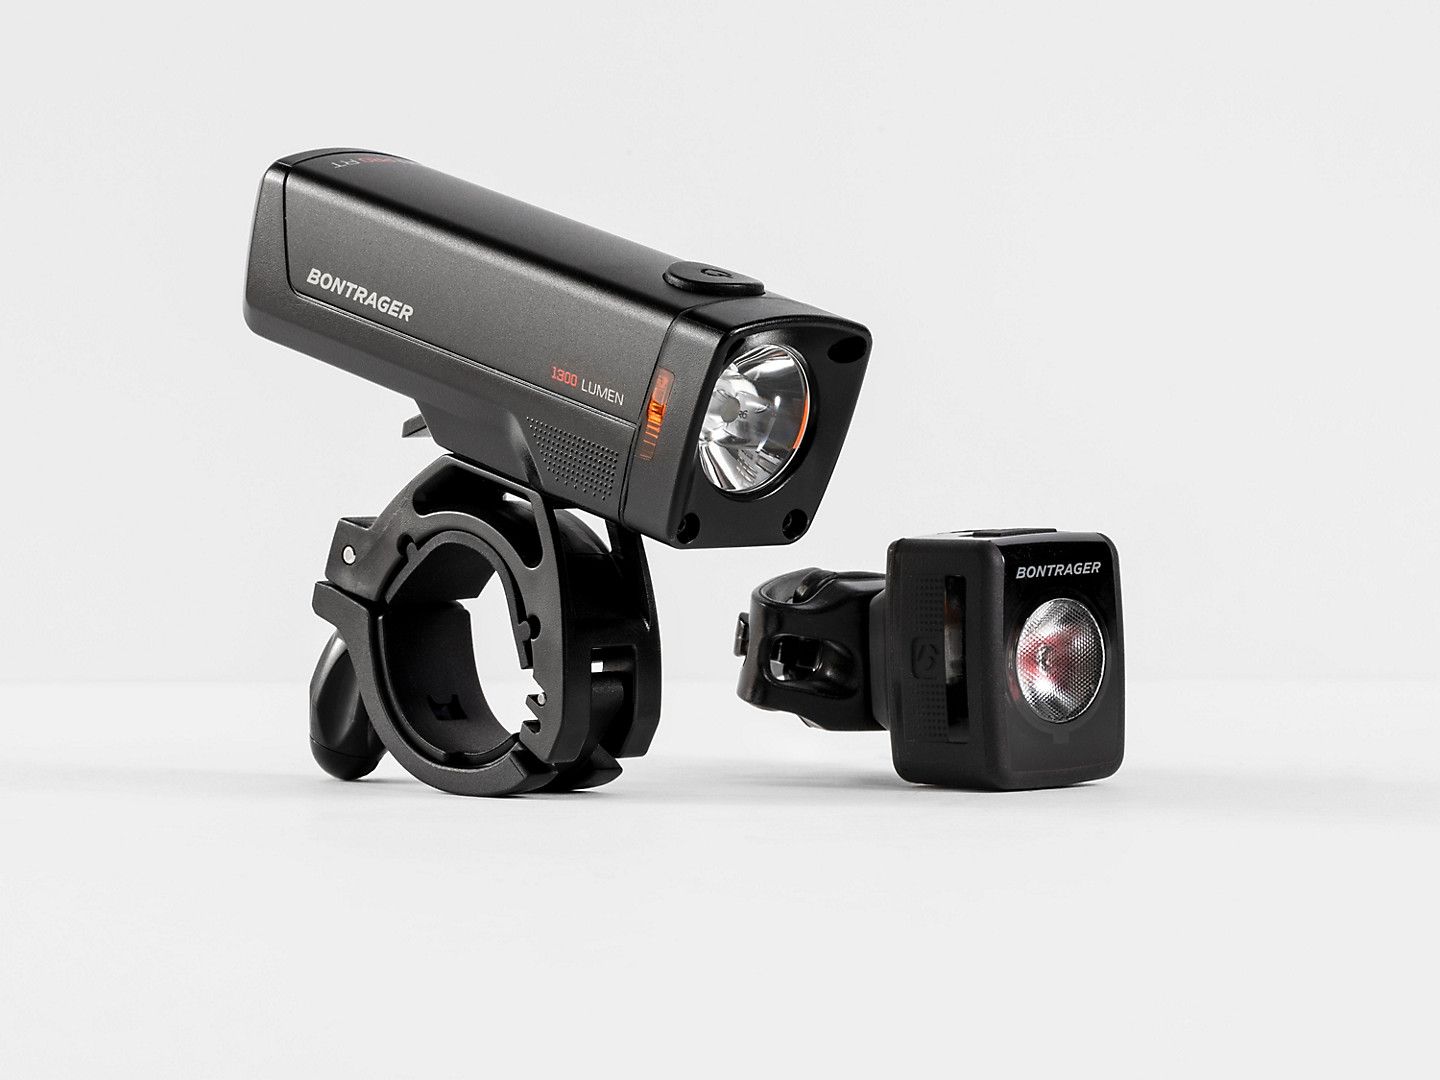
Bontrager Ion Pro RT Mini-Review
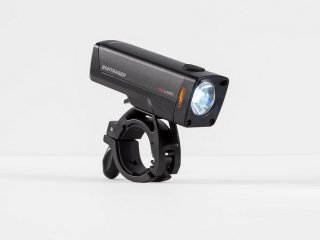
Bontrager lights are one of the few products where a maker that doesn’t specialize in a particular type of product actually makes something that is pretty damn good. When I got the Bontrager Flare RT lights I bought one of them in a kit with an Ion Pro RT. At $124.99, it’s priced a little less than the Cygolite. It’s max brightness is just a tad less bright as well coming in at 1300 lumens. It’s lowest setting is at 400 lumens which lasts for 6 hours. That’s plenty for my needs for sure.
The mount that it comes with can be mounted onto any handlebar or mount point between 24-35 mm. So, yeah, definitely better than the Cygolite already. The mount itself is pretty darn sturdy and stays attached firmly to the handlebar thanks to a rubber insert. The insert does have a tendency to slightly come off when opening the mounting bracket which is kind of annoying at times but not a deal breaker. It’s a good mount. Just can be a little fussy at times.
The good thing about Bontrager lights though is that they’re all Blendr compatible. If you have a Blendr compatible stem, helmet, or the like then you can mount your Bontrager light in other ways. Beyond that, there are a bunch of different types of mounts out there that you can get. That’s probably one of the main perks of this light. I got a Blendr Universal Light Mount so that I could attach the light under my K-Edge combo mount which has a GoPro compatible mount right under it. Works perfectly!

The Ion Pro RT is stupid bright with great dispersion of light thanks to a solid beam pattern. It offers 5 modes: high, medium, low, day flash, and night flash. Full power on high (1300 lumens) is more than enough when you need to “turn on your high beams” as it were. Most of the time you can toggle between medium (800 lumens) and low (400 lumens). Even on low, you’ll find that it lights up the road pretty well. For semi-short rides you can get away with using the medium mode. This is good for times when you’re riding by yourself and need a little more lighting to be safe.
Heat dispersion appears to be pretty good. I don’t think I’ve ever noticed it getting super hot, even at higher settings. I’m sure if I ran it on high for a good length of time it’ll heat up quite a bit. Virtually every light has to deal with heat sinking to disperse the heat. Bontrager appears to hide the heat sinks of their lights pretty well so it’s hard to say how well they hold up to higher temperatures, especially on hot Texas nights. Time will tell if this becomes a problem.
The one feature that I have yet to use is the ANT+ compatibility. As mentioned with the Flare RT lights you can control the Ion Pro RT and any other Bontrager RT lights with either a Garmin headunit or the Transmitr. Being that I don’t have either of these things, I can’t control my light remotely. This isn’t a problem really. I honestly haven’t ran into situations where I really needed to toggle my front light. Still, I think it would be really cool to have it so that I could switch between at least two modes on my Wahoo headunit. Maybe that’ll become a reality someday.
Overall, the Bontrager Ion Pro RT is a quality light. Definitely worth looking at if you’re in the market for a front light.
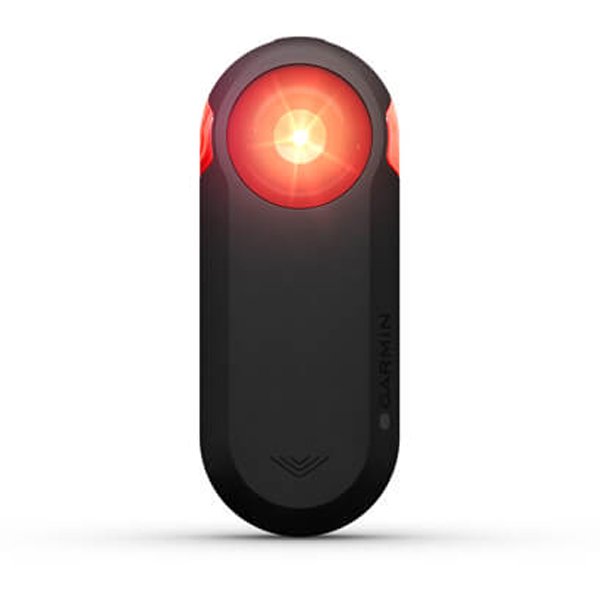
Garmin Varia RTL510 Radar Tail Light Mini-Review
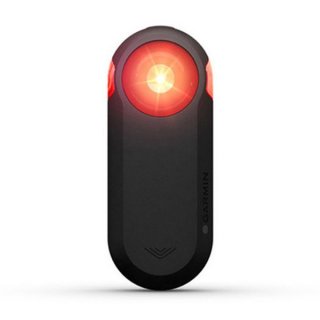
At this point, when it comes to safety with bike lights, I’ve looked at a variety of different features so far: laser lanes, rear turn signals, flashing vs non-flashing lights, and more. But the one feature that I didn’t think about was this: radar!
Aside from the radar feature, the Varia RTL510 is a relatively simple bike light. It offers just three modes: solid, night flash, and day flash. In terms of brightness it’s not the brightest light out there: 20 lumens for solid, 29 for night flash, and 65 for day flash. That’s plenty bright for most riders really. Battery life though is pretty good: 6 hours for solid, 6 hours for night flash, and 15 hours for day flash. Along with the main light, there are also side lights to help improve visibility. But the real star of this light is the radar (Can you tell that I really like saying radar? Radar! :P). Priced at $199.99, it’s definitely not a cheap light but...radar! (Doh! Not again!)
When I started seeing reviews pop up on various bike related sites about the Varia I was quite intrigued. Those who own one seem to really love it. The idea of having a radar sensor integrated into a rear light makes sense. It brings a level of awareness that you otherwise wouldn’t get. Sure, you can just turn your head and/or add a rear-view mirror. Even then, there are times I personally have had cars creep up on me when I least expected it. These are the times when having a Varia makes the most sense.
Now, I had a Garmin headunit at one point so getting a Varia would have made sense at the time. But after switching back to a Wahoo headunit the ability to use a Varia was lost. That changed when Wahoo announced Varia integration with all their bike computers. That announcement alone is what swayed me to consider the Varia.
Now, at some point, Garmin appeared to have a device that you could mount to your handlebar that would give you basic alerts from a Varia. That no longer appears to be the case. So, unless you have a compatible device, you can’t use the Varia radar which, of course, would be pointless.
While on a ride, my Wahoo ELEMNT Roam will give me notifications whenever a car or some other vehicle is within 150 yards or so from me. Notifications in orange mean that a vehicle is moving at a normal rate of speed and/or is at a relatively safe distance. Red notifications mean either the vehicle is moving rather fast and/or is dangerously close to me. These are the ones you tend to pay attention to the most. Getting notifications from the Varia makes it easier for me to pay more attention to the road and less on wondering what is going on behind me. Because I also use a rear mirror on my helmet, the Varia gives me a head’s up that I should look behind me to make sure I’m in the clear. Either way, the notifications become a natural part of the ride. The practical use of the Varia is obvious. It’s a basic set-and-forget type thing but the value can’t be overstated. Once you start using it you’ll quickly miss it when it’s not there.
Just like the Bontrager lights, Garmin has a lot of different mounting options. Because the Varia uses the same mount style as their bike computer, there is a plethora of different ways to mount the light. For instance, while the universal seat post mount that it comes with is ok, I preferred to have a more solid solution like the Seat-post Quarter Turn Mount they sell. I also got a K-Edge Gravity Top Cap Mount but, instead of using it on a stem, I retrofitted it to work on the back of my rack.
Around the time I started writing this review, Garmin released an updated version called the RTL515. Along with that, they also released a radar only RVR315 which has a smaller form factor and likely a good choice for those who don’t want a rear light but want to add the radar functionality to their bike.

The RTL515 remains the same price ($199.99) with the RVR315 going for $149.99. If you’re like me and already own the RTL510 then there’s not really any reason to upgrade. The main things they added were Bluetooth connectivity as well as some new app integrations, especially with smart phone apps. Battery life has been increased a bit as well.
Conclusion
Whew! That’s quite a few lights to cover! I probably could have done a post for each but I figure it’s better to see it all in context on one post. While I didn’t cover every category and price range, I think I covered enough to give you an idea on some things to look out for. So, whether it’s a modestly priced light kit in the lower end to a more expensive light in the middle to upper price range, there’s a little bit of everything for everyone to consider. Now, light it up!
Post a comment!
Comments
Funny Cygolite has been using the same bar mount on their USB lights for 10 maybe 15 years and all of a sudden today I've read three reviews from people who couldn't figure out to remove the inner spacer...? It is in the instructions. You should really read the instructions if you going to post a negative review on something.
Also, for 35mm bars you just slide it up further till the bar narrows. The light rotates on the mount so even if the light doesn't end up level you can still point your beam where you want it.
Granted, at this point they ought to have a 35mm mount available to order. But it's false to say you can't get this light to mount on your bars.
It's possible that the mounts may have changed since I reviewed it. But, at the time, the mount just didn't work. To your point, the spacer can be removed...but the problem there is that removing the spacer also removes any protection for your bar. There wasn't any rubber on the mount I had, thus there was a risk of slippage and scratching the hell out of my bar. Instructions didn't really say much about this. Could very well be that there was an extra spacer that corrects this issue that wasn't included with the light. Regardless, I just wasn't able to properly review it.
Hi. The Cygolite mount does fit on a 31.8mm bar. You need to take out the rubber spacers.
Well, yes and no. If you take out the spacers then you run the risk of scratching the hell out of your bar. Granted, you can probably put something around it to protect it...but would the mount still work with a thin rubber shim? That's the real question. :P